


Table of Contents
Magnetized Soul - Understanding Why Ferrite Can Be "Permanently Magnetic"
Before taking action, we must first understand the principle. Ferrite magnets belong to the category of “hard magnetic” materials, which means that once magnetized, they can retain their magnetism for a long time. The secret lies in their internal microstructure.
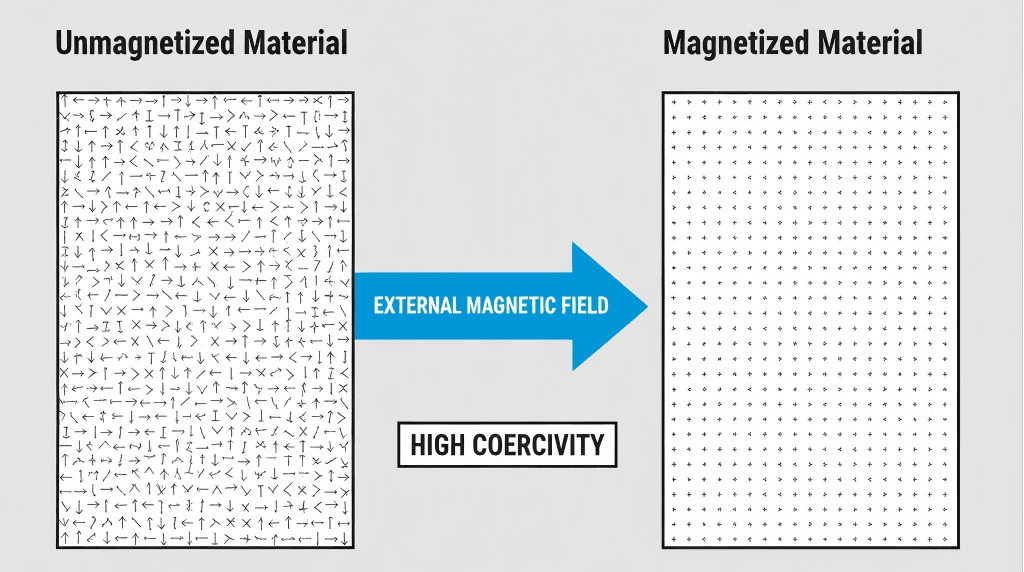
- Microcosm: The “Dance” of Magnetic Domains You can imagine an unmagnetized ferrite material as a city filled with countless tiny “magnets” (known as magnetic domains). In their natural state, these miniature magnets point in all directions, and their magnetic fields cancel each other out, so the material as a whole does not exhibit external magnetism
. A Crucial Step: The “Commanding” Role of an External Magnetic Field When we apply a sufficiently strong external magnetic field, it is like a majestic general issuing an order. All the chaotic miniature magnets (magnetic domains) will start to rotate and eventually align neatly in the direction of the external magnetic field.
- Locked Magnetism: Tenacious “Memory” The key reason why ferrite can become a “permanent magnet” lies in its high coercivity. This property can be understood as the material’s ability to “resist demagnetization”.
When the external magnetic field is removed, due to the high internal resistance and crystal structure of the ferrite material itself, most magnetic domains will be “locked” in the arranged direction and cannot easily return to a disordered state. Thus, this material permanently has its own magnetic field.
The Power of Industry - Standardized Manufacturing Process of Ferrite Magnets

- Raw Material Preparation and Mixing: The main raw materials are iron oxide (Fe₂O₃, red) and strontium carbonate (SrCO₃) or barium carbonate (BaCO₃). They are weighed in precise proportions, and a small amount of additives is added to optimize performance, followed by wet or dry mixing in a ball mill to ensure high uniformity of the components.
- Pre-sintering: The well-mixed powder is pre-sintered at a high temperature of approximately 1200°C. This step is to allow the raw materials to undergo a solid-phase reaction and initially form the desired hexagonal ferrite compound (such as SrO·6Fe₂O₃). At this stage, the material remains loose and unmagnetized.
- Crushing and Milling: The pre-sintered lumps are crushed again into fine powder. The particle size and distribution of the powder are crucial, as they directly affect the performance and density of the final magnet
. - Press Forming: This is a crucial step in determining the magnetization direction of the magnet! The powder is fed into a mold, and while a huge pressure is applied, a strong orientation magnetic field is usually introduced.
- This magnetic field causes the already magnetic powder particles to rotate within the mold, aligning their easy magnetization axes along the preset direction. Without this step, even with subsequent magnetization, only a very weak isotropic magnet can be obtained.
- Sintering and Curing: The pressed “green compact” is fed into a sintering furnace and undergoes final sintering in an atmosphere up to 1250°C. The powder particles fuse at high temperatures, forming a dense, microcrystalline structure with the final mechanical strength. This process “locks in” most of the orientation established during pressing.
- Final magnetization (endowing with soul): The sintered magnet already has the correct internal structure, but its magnetism is weak. Now, it needs to be subjected to “ultimate magnetization” using a pulsed magnetic field or an electromagnet that is much stronger than the orientation magnetic field.
This powerful magnetic field will ensure that all remaining magnetic domains are fully saturated and aligned along the designed direction. After coming out of the furnace, it becomes a fully functional permanent magnet.
Challenges for Practitioners - How to Magnetize Existing Ferrite Materials?
- Operation: Find a neodymium magnet with magnetic strength far greater than that of the target ferrite. Fix the ferrite, and use one pole of the neodymium magnet to unidirectionally, repeatedly, and quickly sweep across the entire length of the ferrite. Repeat multiple times.
- Principle: Simulate a moving magnetic field to gradually guide the alignment of magnetic domains within the ferrite.
- Limitations: The magnetization is limited, non-uniform, and it is difficult to effectively magnetize complex shapes or high-performance anisotropic magnets. This is more like a “wake-up” rather than a “strong charge”.
- Operation: Place the ferrite sample in the uniform magnetic field region between the two poles of the electromagnet. Ensure that the placement direction of the sample is consistent with the desired magnetic pole direction. Then slowly increase the current so that the magnetic field strength far exceeds the saturation magnetization of the ferrite, maintain it for a moment, and then slowly reduce the current to zero.
- Principle: Provide a stable, powerful, and controllable DC magnetic field to achieve full saturation magnetization.
- Advantages: Best and most uniform magnetization effect, ideal for calibration and remagnetization.
- Operation: This is the industrial method for final magnetization of finished magnets. It releases the electrical energy stored in a large capacitor bank through a coil instantaneously, generating an extremely brief but incredibly intense pulsed magnetic field (up to several teslas). Placing the magnet inside the coil allows for instantaneous magnetization to be completed.
- Principle: With the force of “thunder and lightning,” it forces all magnetic domains to align within microseconds, disregarding the coercivity of the material.
- Advantages: It can magnetize any permanent magnet material with extremely high efficiency. However, the equipment is expensive, dangerous, and not suitable for individual users.
Pitfall Avoidance Guide - Common Mistakes and Countermeasures in Magnetization Practice
- Error: Magnetization direction is incorrect.
- Countermeasure: Before magnetization, be sure to confirm the orientation direction of the magnet (industrial magnets are usually marked). For DIY, think clearly about the position of the N/S poles you need.
- Error: Magnetic field strength is insufficient.
- Phenomena and Countermeasures: If the magnetic force is very weak after magnetization, it indicates that saturation magnetization has not been achieved. Please check whether your magnetization equipment (current of the electromagnet, strength of the neodymium magnet) is sufficient.
Ferrite requires a magnetic field of approximately 3000 Oe or higher to achieve better saturation, and high-performance models require even higher.
- Error: The magnetic field was suddenly removed during the magnetization process.
- Countermeasures: For electromagnets, be sure to slowly reduce the current back to zero. The back electromotive force generated by sudden power-off may produce a demagnetization effect, affecting the magnetization result.
- Error: Attempting to magnetize a damaged or overheated magnet.
- Countermeasures: Physical cracks can damage the magnetic circuit, and high temperatures (exceeding the Curie temperature of ferrite, approximately 450°C) can cause complete demagnetization. Ensure that your magnet material is intact and at normal temperature.
- Misunderstanding: Believing that magnetism can be infinitely enhanced.
- Truth: Each ferrite material has its theoretical upper limit of magnetic properties (such as residual magnetic flux density Br). The magnetization process only enables it to reach this upper limit, but cannot exceed it.
Conclusion: From Understanding to Mastery
For industrial manufacturers, this means precise control of every process parameter; for experimenters and enthusiasts, it means skillfully harnessing the power of magnetic fields using the tools at hand.